
A year ago I decided to share my method for making the easiest and most beautiful chocolate covered (or dipped) strawberries. It was one of the first dessert recipes I made for my YouTube channel and surprisingly the ONLY video I decided to not include a written blog post for. I figured the video was self explanatory enough, and maybe a blog post would not be necessary. Boy was I wrong! That is one of my most popular videos to date, and the first one to hit over 100,000 views! I constantly get questions regarding the type of chocolate I use, and so on… So not only will I try to share my recipe, but I will also use this space to answer a lot of your common questions and concerns. Before I get into it, here’s the VIDEO, as that’s still my favourite way to teach you what I know!
Let’s first start with the recipe. You could say I didn’t really have one. It’s also not ideal because strawberries vary in size, and it depends how much chocolate you lightly scrape off the strawberry and so on… Basically all you need in terms of ingredients are strawberries and chocolate – that’s it! Here is my basic recipe, it’s just a guide line. The method is far more important, and we will get to that as well!
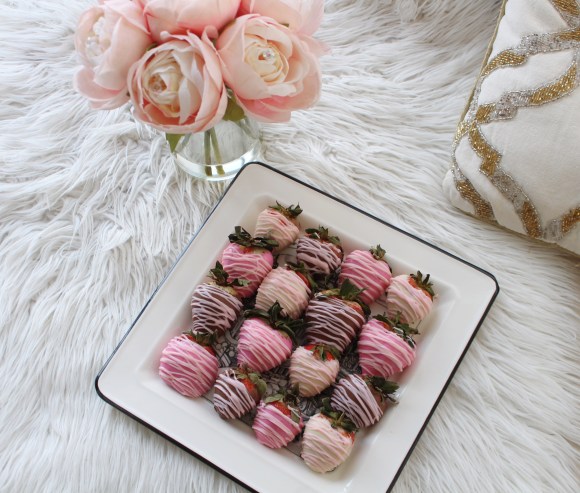
I would say about 1 cup of chocolate per 10 strawberries is a good guideline. You may need more or less, depending on the size of your berry, like I said. In the video recipe I did 3 colours of chocolate: Pink, White, and Brown (milk). I basically used about 3/4 a cup per 7 strawberries, as I used about 7 per colour, meaning I went through about 2 and a bit cups of chocolate for that recipe. I also used additional chocolate to make a pretty drizzle on top.
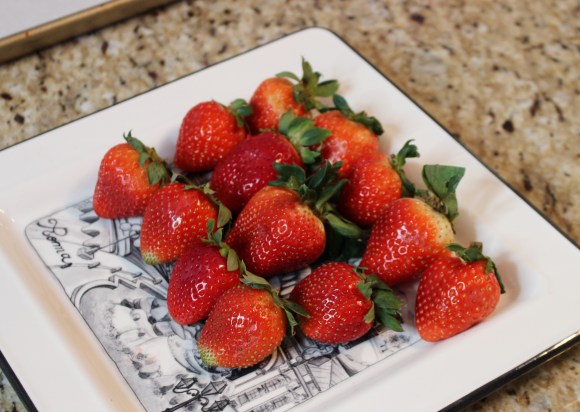
A really important tip, and the first thing you should do is to wash and dry your strawberries! Simply wash them in water and dry them off with a cloth or leave them on top of a cloth to dry. If your strawberries are not completely dry, the chocolate will not properly stick to the berry! So please be sure they are DRY! You will also want to leave the leaves on as you will need those to hang onto while you dip them!
I gave instructions in the video on how to warm up the chocolate in terms of both the microwave method, or a double broiler method (cooking your chocolate over a water bath). Both ways work the same, and usually I like to just use the microwave as that is the easiest and quickest way to melt the chocolate!
Microwave Method:
In a microwave safe bowl, add your chocolate chips, if they are not chips, chop up your chocolate into small enough chunks.
Be sure to use a large enough bowl for melting the chocolate. You do not want to overcrowd a tiny bowl with a lot of chocolate, or else it will not melt properly.
White chocolate is far more temperamental than dark or milk chocolate so you really need to keep an eye on it. The same goes for the coloured chocolate or candy melts.
A good tip is to microwave your chocolate for 20 seconds at a time. So 20 seconds, mix with a spatula, another 20, and so on until it’s melted.
It might not look like your chocolate is melted enough, but it is better to under melt than over melt, or you may over cook the chocolate and it will harden into a big lump (this has happened to me with white chocolate). I believe for the 3/4 cup that I used it look me about 50 seconds to 1 minute of melting. That is 20 seconds, mix, 20, mix, maybe 10 or 20 more seconds and you should be done!
If you prefer to not use a microwave…
Double Broiler/ Water Bath Method:
Fill a medium size saucepan with water, about 1/4 or 1/3 of the way up. Place it on the stove top at a medium low heat until the water simmers, then lower it.
In a heatproof bowl, I use my metal bowl, place your chocolate chips, or cut up chocolate inside.
Place this bowl on top of the saucepan (be sure to use a large enough bowl so that the bottom of the bowl does not touch the water). We want to melt the chocolate with the steam of the water.
Stir continually until the chocolate melts, then take the bowl off of the sauce pan.

Now that you have washed and dried your strawberries and know how to melt the chocolate, let’s dip our strawberries!
First, be prepared. You will need a tray lined with parchment paper, that will be large enough to fit all your dipped berries, yet small enough to fit in the fridge. You can of course use 2 or as many trays as you need, but remember to save room in the fridge! Next..
In the same bowl that I used to melt the chocolate in, and while the chocolate is still warm, simply hold your strawberry by the leaves or stem and coat your entire berry in chocolate (but not the leaves). If your bowl was really large, you may need to transfer your chocolate to a smaller bowl for dipping, as it is much easier to fully submerge your chocolate in a small bowl, rather than a large one, especially when there are only a few strawberries left to dip.
Once you coat your strawberry in the chocolate, I like to use the side of the bowl to lightly scrape off access chocolate from the bottom. This way once they cool off you are not left with a huge puddle of chocolate on the bottom. Though that would be tasty, it wouldn’t be as pretty.
Next, place your strawberries onto a tray lined with parchment paper. I like to use parchment paper but you can use wax paper or any non stick surface to cool. I have been asked this question as well, and unfortunately tin foil would likely stick to your chocolate, so it’s best to stick to parchment paper or wax paper!
Once you have finished dipping all your berries, you can then use the extra chocolate that is left over, or melt some more for the chocolate drizzle! I love this step as it’s fun to do. In my video I added the pink chocolate to some white chocolate to make a pale pink colour, and then I placed the melted chocolate into a ziplock bag. I twisted the top and cut a tiny tip off of one corner, and I drizzled stripes onto the strawberries for a pretty and elegant look. This really dresses up the strawberries and takes them to another level! You can watch me do this in my video (at around the 8 minute mark – Here! )

Once you are finished you will need to refrigerate your berries until the chocolate sets. Usually this takes 30 minutes more or less. Or you can refrigerate until you are ready to serve. I would even make these a day in advance but not more than that, as your berries can get mushy in the fridge for too long (or left out for too long). It’s best to eat these within 24 hours (up to 48 hours) of making these. Remember to always refrigerate until you are ready to eat. Once you are ready, these are best kept out about (at least) 15 minutes prior to eating so that your chocolate isn’t too hard! Do not keep these out for longer than 2 hours or the berries may release too many juices and become soggy.
You can of course easily lift off your strawberries from the parchment paper and break off any access drizzle that set on your berries. Then plate your chocolate covered strawberries or place them in a cupcake liner and package them to be gifted!
Ta-da! You are done..

As you can see, these are a bit temperamental but they are so easy to make!
I of course over complicated things by being very detailed and specific. I just really want this recipe to work for you all! Especially since so many of you are making these for loved ones. I really want to guarantee your success!
The basic instructions would be:
Melt Chocolate
Dip Strawberries
Lay on parchment paper
Refrigerate until ready to eat
(😂😂😂)
A commonly asked question is what type of chocolate did I use. Since my recipe is so simple and I essentially just melt my chocolate in the microwave (or over a double broiler which I show you how to do in my video), you don’t need to worry so much about a brand, as any chocolate that will melt is acceptable. I do not add oil or cream or anything to the chocolate, so you don’t need to worry about it curdling or not properly melting. What I did use were chocolate chips (Chipits brand), and candy melts for the pink colour. Looking back, you could also add a tiny bit of pink (or red) food colouring to the white chocolate to achieve a desired pink colour (since this is Valentine’s Day, and that is what makes these so pretty). You could also use dark chocolate if you prefer. A good rule is, if you wouldn’t want to eat that chocolate plain, don’t use it. I would also recommend the Bakers chocolate brand, as that is especially good for melting. I am Canadian, so if these brands are not familiar, any brand of chocolate in the baking isle should be good… if it melts, it will work! I purchased the pink candy melts from a candy bulk store called Bulk Barn. Any specialty store for decorative baking needs will have this.
Thanks so much for reading, and hopefully watching my YouTube Video as well! If you have any further questions please do not hesitate to ask. If you make these and you enjoyed them, please let me know! If you have Instagram and tag me with #ladolcelisarecipe and your page is open, I would love to see your creations!

Happy Valentine’s Day if this applies, or else please enjoy these delicious classic treats!
Xo
– Lisa (@ladolcelisa)

3 replies on “Chocolate Covered Strawberries – Valentine’s Recipe”
[…] Chocolate Covered Strawberries – Valentine’s Recipe […]
So good! Made it tonight!
[…] Chocolate Covered Strawberries – Valentine’s Recipe […]