
If you know me, you know the sentiments I have for these French sweets run deep… Ever since my first bite, back in 2010, I’ve been hooked! French macarons, if done right, are as beautiful as they are delicious. The perfect macaron should never be too chewy or crunchy. Rather, this delicate cookie should have a slightly crisp exterior, and a smooth, melt in your mouth interior. This cookie is extremely difficult to master, but definitely worth the effort. With my recipe (and video), I tried to be as thorough as possible in teaching you – making it that much easier to finally master the macaron! As a humble home baker who has tried and “failed” many times, finally mastering the macaron has provided me with the tools to hopefully making this recipe FOOL-PROOF! If you are really careful, organized, and precise about things, you will not go wrong here. Using the Italian meringue method (a method most French pastry chefs use), rather than the French method, the results yield a much tastier, and stable cookie. The French method requires whipping the egg whites to stiff peaks, and adding the almond flour, sugar etc… With the Italian Meringue method, which can sound intimidating, the directions are a bit more complicated, but yield better results. You are required to cook a portion of the sugar; making a syrup, and pouring it into a portion of the egg whites; thus, making an Italian meringue, that you will then add to another portion of egg whites, and ground almonds, and sugar, etc… It sounds complicated, but I assure you, as I walk you through it, you will find that it is actually quite simple, and will definitely provide you with the results you are looking for. Watching my video HERE will also definitely give you a better visual guide in understanding the instructions. In this beginners tutorial, I have also provided you with 2 simple filling recipes, a basic chocolate ganache and a simple rose butter cream. So without further ado, let’s get started. Here is how to make lovely French Macarons using the Italian Meringue method:

Important tools you will need to get the job done:
A kitchen scale – this is used to measure your ingredients. This recipe calls for grams rather than cups. There is no proper way around this, as everything must be accurately measured here.
A stand mixer (I use my kitchenaid) – you really don’t want to use a handheld mixer here, as your egg whites will be whipping while you are completing other steps.
A digital kitchen thermometer – this is for the Italian Meringue, and is required for cooking the sugar syrup.
A sift – this is important as we sift through the almond “flour” and icing sugar several times.
Parchment paper – you will need this to bake the macarons on, to assure they do not stick.
A piping bag – this is used to pipe the macaron batter onto the parchment paper
*There are several other tools I use that I do not mention, but all of these are likely in your kitchen already – ie. a baking tray… etc.. And we will get to those later. I wanted to mention important tools that you may not already have, and why you need them.

Macaron Shell Ingredients:
150g Ground Almonds
150g Icing Sugar
55g Egg Whites (aged)
150g Sugar (granulated/caster)
37g Water (bottled/distilled)
55g Egg Whites (aged)
*Optional: Food colouring (see notes)
*Notes:
I age the egg whites for around 7 days (more or less) in the fridge. What this means is that about a week before I want to make these, I separate the egg from the yolk, and weigh about 110g (usually even 115g because they loose some volume over this time), and once weighed and separated, I place the whites in a container, and keep them in the fridge for 7 days to “age”. Some people say this step is not necessary, I have found that it helps (maybe it’s the placebo effect here, but I haven’t made a bad batch this way), apparently the egg whites are more stable this way… Whatever works, right? I do this, so give it a try and see if it works for you.
When it comes to food colouring, I like to use either powder (which is a bit difficult to find), or gel colouring. In this recipe I use gel and it works great. I find gel to be better because it is not your typical liquid food colouring. We really do not want to add any additional liquids here, and sometimes the addition of too much liquid colouring can mess up your batch. Use gel to be sure that your macarons will have a pretty colour without changing your batter. There is not a precise measurement here, but you can get an idea of how much I use in my video. You really just do this by eye, using a tiny pea-sized amount, if even that – it depends on how vibrant or tame you want your cookies.
When it comes to the ground almonds, I do not grind them myself, though you can if you prefer, however, I buy blanched ground almonds (almond “flour”), making the job easier. Do not worry if it is a tiny bit lumpy, we will take care of that through sifting.
A little note about the icing sugar, or powdered sugar, be sure to use a fresh bag. Do not use one if you aren’t sure if it’s fresh, or if it’s been opened for many weeks (or months), and be sure there is not added corn starches in the sugar.
Instructions:
Now, let’s get started. You will need 150g of almond “flour” meaning ground almonds, and 150g of powdered sugar (or icing sugar).
Some recipes call for you to further grind together the powdered sugar and ground almonds. I have done this before using a food processor, but I find it is not necessary (and can even make your almonds too oily, thus ruining the batter). What I do instead is sift together the almond flour and icing sugar 4 to 5 times, to assure all the lumps are gone. Once you sift it together, you will find a few lumps (of almond and sugar) each time are left in the sift. Discard this, and replace any missing lumps with more almond and sugar. I do this using my scale so I know that this mix will weigh 300g in the end. 150g icing sugar and 150g ground almonds. This step is to combine your sugar and almonds making the macaron “flour” and to be sure your macaron shells will be smooth (and not too bumpy with lumps of almonds and sugar). *You can watch me do this in my Macaron Video HERE*
Your ground almonds and powdered sugar should be in a large bowl at this stage, because this bowl will be where everything eventually ends up. Set the “flour” aside for now, and let’s focus on the egg whites.
Take your aged egg whites and measure out, on your scale, 55g of whites in one bowl, and 55g of whites in another.
Once measured, you can place one of the 55g of whites to your stand mixer, and set aside.
With the other 55g of whites you can add colouring at this stage if you like. A little bit goes a long way with colouring, I also like my macarons to be on the paler side. To see how much I added, you can watch my video, as I did not measure this, I just added a tiny amount with my knife, and mixed it into the whites.
With the now coloured whites, we can add them to the “flour” (almonds+powdered sugar), and mix them in with a spatual to combine and essentially form a paste. You don’t have to be too gentle, but don’t over mix either. I usually mix until I see a paste form, or my colouring looks nicely combined. This paste will be coloured (keep in mind, the colour will eventually be paler when we add the meringue). I like to keep this from drying out by using either plastic wrap over this bowl, or a cloth. Set aside for now.
We can work on the meringue at this time. Measure out 150g of regular white granulated (or caster) sugar. I measure this already in my medium sauce pan. In this pot we will then need to add 37g of water (do not use tap), bottled or distilled works best. Once you have your water and sugar, you can then place this on the stove top. I place this on a low/medium heat. Once this is on, I place my kitchen thermometer in this mix. You do not need to touch or stir this mix, it will eventually become a syrup.
Once this mix reads about 45 to 55 degrees Celsius, I then turn the stand mixer on to a medium/high speed of about 6. Your 55g of uncoloured egg whites are in here, with the wisk attachment. As we wait for the sugar to get hot enough, the whites will begin to mix.
Once your sugar syrup reaches 118 degrees Celsius, you will take the syrup off the stove top, and with your stand mixer still going, you will pour this syrup into the whites (which will look frothy), in a slow and steady stream. Careful not to get syrup on the whisk, you want to find that sweet spot between the side of the bowl, and the whisk.
Once your syrup is in, I usually increase the mixer to about an 8, and let that go for around 2 minutes. After the 2 minutes, the bowl shouldn’t be too hot to the touch. I usually take my thermometer and find this mix to be about 40 degrees Celsius at this point. I sometimes give it a 20 to 30 second mix at about an 8/10 speed.
Once your meringue is finished, unlike in the French method, it will not be an extremely stiff peek, but rather a medium peek – fluffy, thick and glossy.
At this stage, uncover the coloured lump of meringue paste, and add about 20% to 30% of the meringue to the paste, and give it a mix with the spatula. Be a bit gentle, but not overly so. You may use about 20 to 30 folds/strokes here (it really just depends on how you fold). I do this just to introduce the meringue to this paste, to loosen up the paste and slowly work the meringue in. Once combined, I then add the rest of the meringue. Be careful at this stage to not over mix, or under mix for that matter. This is a tricky part known as macaronage, you really need to carefully fold in the meringue (properly combine everything) without over mixing. I find about 30 folds/strokes to be great. This entire folding process usually takes me about 2 minutes. Again it depends on you and how careful you mix. What helps is I usually stop mixing when I find the colouring to look perfectly combined, and I see there are no streaks of white meringue. If you are not using colouring, what helps is to bring a bit of the batter up with your spatula, and see if you can make a figure 8 with the batter, without it breaking off too soon. You really don’t want it to be too runny. People say your batter should flow like lava, which is true, but I find that to always confuse me, as even if you over mix, your batter will still look like lava. To see how I mixed, you should of course check out my video. This part I find can be the make-or-break of your macarons. That and over or under whipping your meringue. So be VERY careful at this stage.
Now you have your batter!! You want to place this in a piping bag right away. I have a very large one that I can fit all the batter in. If you do not, just cover with a towel or plastic wrap any left over batter that is not yet in a piping bag.
In my piping bag, the tip is already snipped off and I find it to be a great size of about 1 cm. If you want, you can use a round nozzle to pipe, but I find this unnecessary for myself.
On a baking tray lined with parchment paper, I usually put some macaron batter under the 4 corners of my parchment paper to allow it to stay put on my baking tray. Pipe approx. 3 cm rounds of macaron batter. Your batter will slightly spread, that is normal (from experience, if your batter spreads out way too much, you’ve likely over mixed). Once you pipe a row of macarons, as you are on the next row, you should see your batter lightly go down on it’s own, meaning the tops of macarons can have extra batter on top because of how we piped them, if they go down naturally on their own, they are good, if you think you need to flatten the tips with your finger, you may have under mixed. If they completely flatten the second after they are piped, you likely over mixed. Ahhh so tricky, I know, believe me, I know… Hopefully if you followed my tips and instructions, your batter will be great!
I pipe these macarons by eye, but if you want to be exact, you could always draw circles on the back of your parchment paper to keep them a uniform size. I however, do these by eye and match them up later – I usually find a macaron, and try to find one of the exact same shape and size.
Once piped, you will need to bang this batter on the counter a few times, usually 10 times works for me. I also even tap underneath a few times as well. This gets any trapped air bubbles out. It seems weird, but it’s good to do. You can even take out any tripped bubbles, working quickly, with a toothpick. This just assures smooth tops, again, we don’t want to see air bubbles. Watch my video here. (I’m sure I will keep saying this throughout, but be sure to watch my video as it helps to visualize everything).
This piped batter needs to rest for 30 minutes at room temperature to assure a “skin” forms. Let your macarons sit, and eventually after the 30 minutes, you should lightly be able to run your finger on top, or tap, the macaron, and it should not stick to your finger. This step is very important as this will help your macarons rise and develop those perfect little frilly edges, known as “feet”.
While you are waiting the 30 minutes, I usually clean up a bit, and then set my oven to 335F. Ovens are tricky and they are all different. Even the room temperature or oven temperature can effect your macarons. Be sure to make these when it’s not too humid out. Also be sure to know your oven. For example, mine is tricky.. I can set it to 335F, and its great for the first batch, but by the time I’m on the second batch, it dips lower… It will even read as 335F, but if I cancel and reset it, it takes a few minutes to get back to 335F! I usually have to reset my oven after each batch. Your oven may get hotter over time, so be careful about this too. I find 335F for about 12 minutes works best for my macarons, but you may need to play around with this and either add or take away a few degrees. Another note about ovens is to know where your heat is coming from. Mine comes from the top, but yours may come from the bottom. What I find works best for me, is to place the macaron tray right in the middle, almost mid-low rack, about 3rd from the bottom. Do not try to make more than one tray at a time, and try experimenting with placement. If your tops look a bit burnt, you may want to lower your rack.
After the 12 (or 13) minutes, hopefully your macarons will look BEAUTIFUL. They should be slightly shiny on top, have little feet (that haven’t spread out too much), and eventually when you remove them from the parchment paper, they should come off easily without too much give. If you find your macarons are not able to come off the parchment paper easily, they might be under baked. I let them rest about 5 to 10 minutes on the parchment, then I slide the parchment off the tray, so I can reuse the tray, and once cooled, I slip the macarons off the parchment. You may need to help them out a bit by lightly bending the parchment paper off the macaron – however, if cooked, and cooled properly they should really just easily pop off. I then place the macarons on a wire rack to cool completely, as I continue to bake. Since the macarons need 30 minutes to form that “skin” I tend to pipe another batch while one is already in the oven. You will get the hang of it.
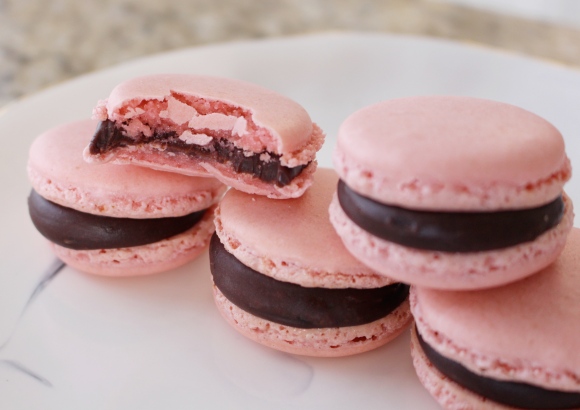
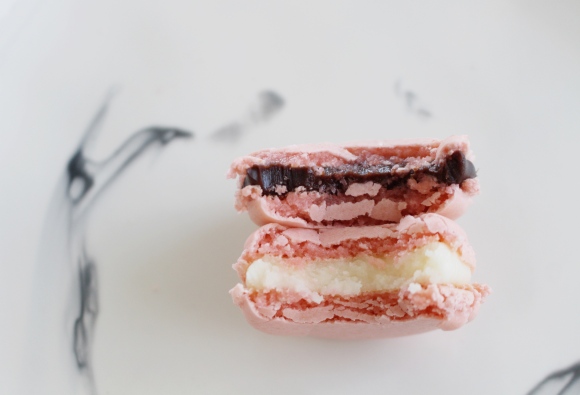
It’s always a good idea to make your ganache or buttercream ahead of time, however I always do this after the first batch comes out of the oven perfectly. If my macarons do not come out looking great, there is no point in making the filling! These are such tricky little things to make, so you never know. I used 2 basic fillings, like I said earlier. One is a chocolate ganache, with added salt, and the other is a buttercream that I flavoured with rose syrup to create a rose buttercream. I found these exact measurements to be the perfect amount of filling for these macarons. If you prefer one filling over the other you can of course double the recipe, and that would work as well. Both are SUPER simple and easy to make…
Salted Chocolate Ganache Ingredients:
115g (or 1/2 cup) Heavy Cream (Whipping Cream)
115g (or 3/4 cup) Semi-Sweet Chocolate (I used Chips)
*Optional Pinch of Salt (about 1/8th tsp)
Instructions:
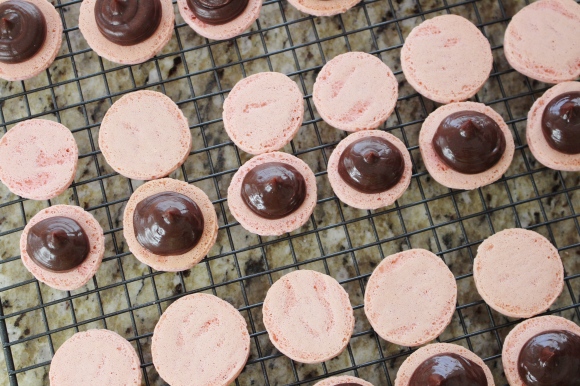
Add the heavy cream to a medium sauce pan, and place on the stove at a medium heat until it comes to a simmer. Careful not to over-boil your cream or it may boil over.
While the cream is warming up, place your chocolate in a medium bowl, and add the pinch of salt, I used flor de sal, but any salt will do. This is optional, but I find salt to bring out the taste of the chocolate. You can add more or less to your liking, for a lightly, or heavily salted chocolate. I eyed it, but I would guess about 1/8th of a tsp went in.
Once the cream comes to a light boil, remove from the stove top, and pour into your salted chocolate bowl. Let the cream sit for about 1 to 2 minutes before mixing.
After the minute or 2, you can then use a whisk or spatula and mix the chocolate and cream, slowly, and easily, this liquid and chocolate mix will turn into a beautiful ganache. It will thicken up even more so over time. Keep mixing until well combined.
I use this ganache as a macaron filling, so I covered it with plastic wrap and placed it in the fridge to thicken and set up quickly. It was in there for about 1 hour.
I personally find that a ganache is my favourite type of macaron filling, as it turns the cookie into that perfect texture that I am after. I however wanted to also include a buttercream as that is also a nice filling option.
Rose Buttercream Ingredients:
1/4 cup Salted Butter (if you do not have salted, add 1/8th tsp salt)
1 1/2 cups Icing Sugar
1 tbsp Rose Water
1 tbsp Rose Syrup
Instructions:
Cube the room temperature butter and place into a mixing bowl. On medium speed, cream the butter with the whisk attachment (I use my stand mixer), for about 1 to 2 minutes.
I then add my sugar, usually I start with 1 cup, taste it, add another 1/2 cup, and make sure it is sweet enough. You can always add more sugar, but you cannot take away, so I do this in stages. I have found 1 and 1/2 cups works best, but if you would like it sweeter, you can even add another 1/2 cup.
I then add the 1 tbsp of rose water and give it another mix. Sometimes I do this in between the icing sugar stage, but it really doesn’t matter exactly. Give this another mix.
Once combined, add the rose syrup, and give this buttercream a final mix, for about 1 minute, or until everything is properly combined and creamy.
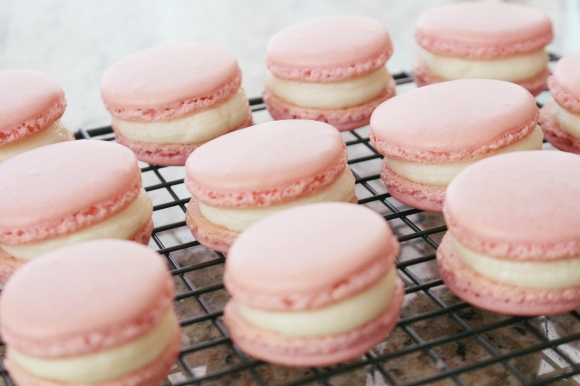
At this stage the buttercream is thick enough to add to a piping bag and use. I like to place this in the fridge, and have it thicken up a bit for about 15 minutes. While this happens I usually clean up a bit, and then add this to a piping bag.
As you can see this is a very simple, and basic American style buttercream. You can replace the liquids with any flavour of your choice. In order to create a vanilla buttercream, I would replace the 2 tbsp of liquids with about 1 to 2 tbsp of vanilla extract, etc.. I used rose because my macarons this time around were coloured pink, and I figured that would be pretty.
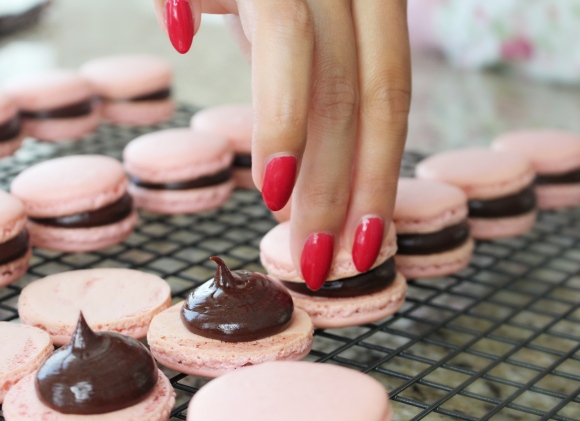
With both the ganache and buttercream, I fill a piping bag and pipe them similarly: I start in the center of the cookie, and fill until a nice round mound of filling forms. I then gently place the macaron shell (or cookie) on top. I tend to like a lot of filling, so I am quite generous with the filling, as you can see from the photos and video!
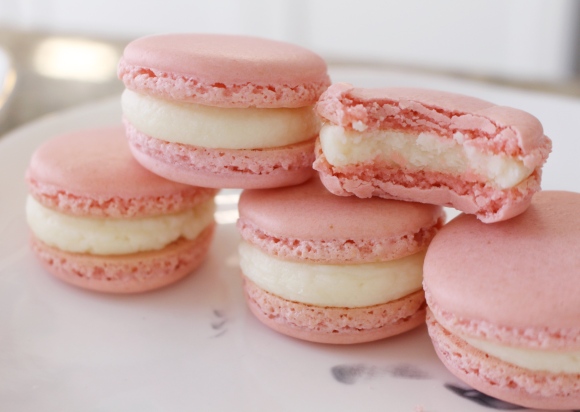
Once piped, these cookies CANNOT be eaten right away. That’s right, you need to wait before taking a bite. After all that time making these tricky little cookies, and you can’t even taste these. These need to be carefully placed inside a container, and with the lid on, these need to go inside the fridge for at least 24 HOURS!! Yes, you have to wait an entire day, but trust me, it will be worth it. If you were to take a bite now, these would be too chewy. During the 24 hours in the fridge, some type of magic happens and it truly turns those two shells, with filling in the middle, into one perfect macaron. After the 24 hours (at least) in the fridge, you can then take them out, and let them come to room temperature for about 30 minutes (give or take, depending on how warm or cool the environment is). Macarons should NEVER be too chewy, or crunchy at all. Rather these cookies should have a slightly crisp shell, yet be soft, and melt in your mouth. Once you’ve perfected this difficult cookie, you will keep coming back for more! These cookies should always be refrigerated until you are ready to eat, then they must come to room temperature. I could of course eat them right out of the fridge, but room temperature is best. I also eat these macarons in my YouTube video.
I know this blog post is quite long, as is my video, but I wanted to be very thorough in explaining everything, from the ingredients to the instructions and beyond! I hope you decide to give these a go, and if you enjoyed these macarons, I will of course be making more, with various fillings for you to enjoy. I really just wanted to explain these steps properly the first time, that way this blog post and VIDEO could be referred to whenever you decide to give these a go. They are tricky, and I have even failed quite a few times, but I didn’t give up and can finally say that I’ve mastered the French Macaron, and so can you!
Thanks so much for reading and watching this video. If you have any questions, feel free to ask, and I will do my best to answer 🙂
Love: Lisa (@ladolcelisa) – On YouTube & Instagram

3 replies on “Mastering The Macaron | Recipe with Chocolate Ganache & Rose Buttercream”
Best best best macaron video and recipe!! You have totally mastered the macaron!!! amazing ❤
Thanks so much sissy! It was a long road.. lol ♥️
[…] https://ladolcelisa.com/2018/09/18/mastering-the-macaron-recipe-with-chocolate-ganache-rose-buttercr… […]